The most underrated technique to turn new signups into power users
Step-by-step guide showing you how to build an onboarding hub for your product
Hey there, it’s Yaakov from Valubyl. Welcome to another edition of Product Led Growers, my newsletter that simplifies product activation and adoption.
In this week’s newsletter, I’m going to show you step-by-step how to build an onboarding hub for your product. We’ll explore what it is, why it’s crucial, and I’ll share some best practices and examples to help you get started right away.
Let’s dive in!
What is an onboarding hub?
Over the last year advising 10+ SaaS startups, this has been my favorite technique to increase product activation. And honestly I think it's the most underutilized way to turn new signups into power users.
It's not something new, companies like Hubspot and many others have been doing this for years, but I've started noticing a trend of more product's taking advantage of it too and I can tell you from first hand experience - it works!
If you're struggling to get new users set up well in the product then you should definitely give it a try. And with tools available like Dopt, it doesn't have to be such a heavy lift for engineering. You can set it up in just a couple hours, and even start experimenting with personalization too.
Some call it an "onboarding hub", others are calling it a "getting started" or a “setup” screen. Simply put, it is a central place where your users can find everything they need to successfully get started with your product:
Clear actionable instructions showing them what they need to do.
Quick and easy access to all the core actions they need to take.
Helpful resources and support access if they need an extra hand.
Here’s an example of how I helped my client, Databox, transform their empty home landing page into a powerful “Getting Started” set up screen.


The results were fantastic! This simple redesign seriously boosted the number of users taking those first critical steps - jumping from less than 15% to over 25% completion of the setup milestone within 3 weeks, paving the way for deeper product adoption.
You can read the full case study of the experiments we ran at Databox here.
(+ I’ll explain a little more about activation milestones later in this post)
Why does my product need it?
If you’re offering a self-serve version of your product, whether freemium or free trial, you already know that getting new signups to actively use your product is harder than it seems.
Approximately 60%+ of all new signups vanish after just the first few minutes!
Given the cost of acquiring these signups, it’s crucial to give users a real chance to quickly find value in your product.
Most product experiences can be confusing, with users spending precious time just figuring out which buttons to click or which features to use.
An onboarding hub eliminates guesswork, empowering users to quickly understand and execute the necessary actions to discover your product's value.
How to build it:
Creating an effective onboarding hub is essential for ensuring users not only start using your product but also recognize its value quickly and efficiently.
Here’s how you can set up a hub that meets user needs right from their first interaction:
1. Clearly Define User Steps
Make it intuitive: Start by mapping out the user journey in the simplest terms possible. This involves breaking down the process into manageable, easy-to-understand steps.
For example, if your software is an email marketing tool, your steps might be: setting up an account, creating your first campaign, designing an template layout, and sending your first email.
Once you’ve mapped out the path you want users to take, you can turn it into a checklist for users to complete one step at a time.
Provide interactive guides: Use tooltips, walkthroughs, or interactive tutorials that users can follow step-by-step within the product itself.
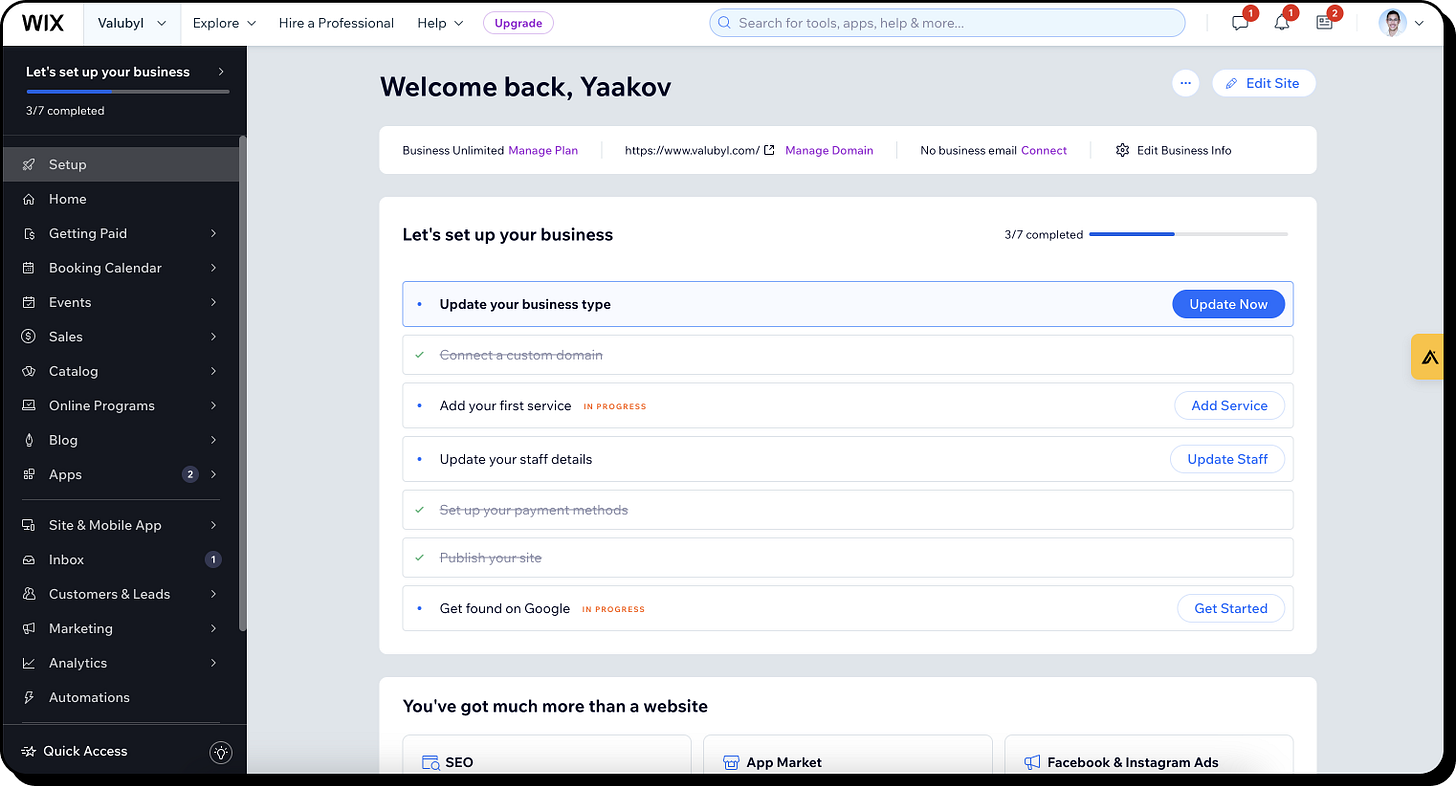
Visual progress indicators: Implement progress bars or checklists that visually represent how far the user has come and what remains. This not only helps in providing a sense of achievement but also in motivating users to complete the setup.
Here’s a great example from Wix’s Setup page:
In a short video course I created called The Product-Led Onboarding OS, I explain how to break up your user journey into 3 different activation milestones:
The setup phase involves the user performing the necessary actions that will get them to your product’s core value.
The aha moment is when the user has received and realized the core value your product has to offer.
The final milestone is repeating this behavior and developing a ‘habit’. Instead of this being a once-off experience, we need them to want to come back. We look at this step by analyzing repeated ‘aha’ moments by our users within a specified frequency (daily weekly etc.).
If we look through this perspective, your onboarding hub should include everything users need to go from sign-up → set up → aha.
It’s important to remember that different user types will probably have different goals and problems they’re trying to solve. Your onboarding hub is the perfect place to personalize the experience - customizing the steps, copy, and different templates/quick-links - for different users to match their unique needs and desires.
You can also group different use cases into their own checklists or predesigned journeys which can really help users understand how to achieve their unique goals in your product.
If you’re wondering how to figure out what different users want when they signup, it's simpler than you might think – just ask them! Check out this post below for more on that.
How to figure out what new users want
In my experience advising a range of different SaaS companies, I've witnessed my fair share of teams fumbling when it comes to understanding their users' needs. You know the drill. Subpar onboarding, clunky user experience, missed growth opportunities. And most of the time, it’s because they’re asking the wrong questions – or worse, not asking any at all!
2. Simplify Action Steps
Direct action options: Wherever possible, enable users to take action directly from the onboarding hub. Include buttons like “Set up your first campaign now” or “Import contacts” that lead directly to those actions within the product or allow them to perform them right there and then.
Pre-fill settings and templates: Reduce the effort required to get started by providing templates or pre-filled settings that address common use cases.
For example, if your product is a project management tool, offer template project plans for product launches, events, or marketing campaigns… depending on what will best help your users.
Educational sidebars: Integrate sidebars or pop-ups that provide quick tips or video clips on how to complete an action as they navigate through the initial steps.
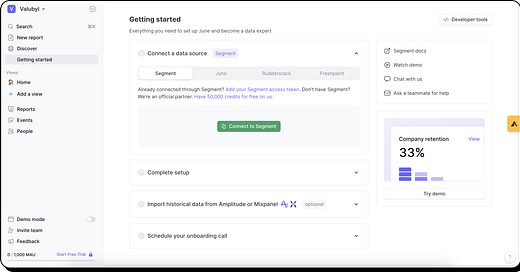
Another awesome example from June.so:
3. Easy Access to Help
Support channels: Offer multiple ways to get help, including live chat, a well-designed FAQ section, and a resource library with text/video tutorials. Make these easily accessible from the onboarding hub so users can get help without having to leave the process.
Feedback loops: Include a simple feedback form or prompt within the onboarding hub that asks users if they found the help useful or if they need more assistance. This can inform continuous improvements and personalize support.
Community access: If applicable, provide links to community forums or user groups where new users can ask questions and get advice from more experienced users. This not only helps with immediate issues but also engages users with your product community.
4. Use Data to Refine and Improve
Analytics integration: Utilize analytics to track how new users interact with your onboarding hub. Look at where users drop off, what steps take the longest, and what features are used the most/least.
A/B testing: Regularly test different versions of your onboarding process to see what works best. For instance, does a more graphical approach reduce setup time compared to a text-heavy one? Adjust based on real user data.
Iterative improvement: Onboarding should not be a “set it and forget it” process. Continually refine and update the onboarding hub as you gather more insights and as your product evolves.
Conclusion
Quick recap:
Clarify the steps your users need to take.
Make those steps simple and actionable directly from the hub.
Ensure users have easy access to support to help them succeed.
By focusing on these key aspects, you’ll build an onboarding hub that not only educates but also engages and excites your users about what your product can do for them.
Thanks for tuning into this week’s edition of Product Led Growers. I hope these insights empower you to create a powerful onboarding experience that delights your users and drives real product success.
Stay tuned for more tips and strategies to help you lead with your product.
See you next time! :)


Really appreciate this one, Yaakov. Onboarding hubs are underrated. I’ve seen teams pour energy into onboarding flows but skip the 'one place to start' piece. Having that anchor makes a big difference in activation.